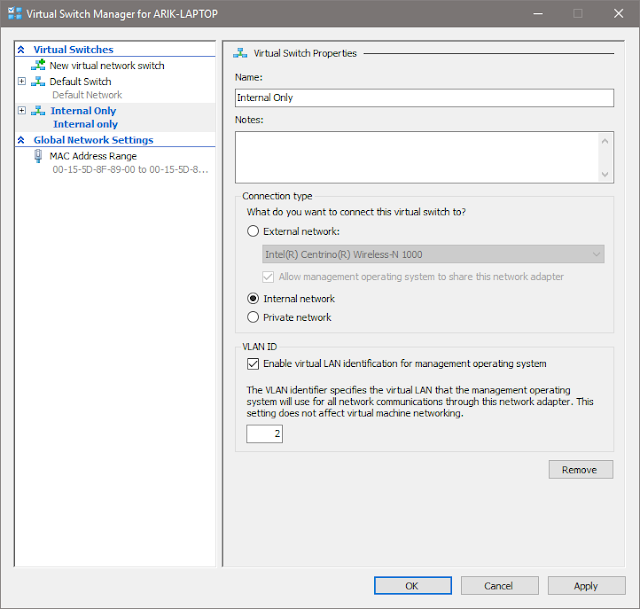
In the Actions pane, in the right-hand portion of the Hyper-V manager window, click "Virtual Switch Manager."
Click "New virtual network switch" in the left pane to create a new virtual switch. There are three kinds of virtual switch that Hyper-V can create:
- External - This option bridges to the physical network adapter installed in the host computer, allowing VMs to access the physical local network as if they were discrete devices. If the host has more than one network adapter, one may be dedicated solely to the virtual switch, while others remain devoted to the host.
- Internal - This option effectively creates a LAN that is accessible by the VMs connected to the virtual switch. By default, VMs will not be able to access the host's physical network connection. Hyper-V does create a virtual network adapter in the host operating system, so VMs can communicate with the host; we can take advantage of this to allow the host computer to act as the default gateway to the internal-only VM LAN, which will allow us to better segregate our VM network from the rest of the world. This is the option I will be using for this instance.
- Private - This option is like the Internal option, but does not allow communication with the host computer through the virtual network adapter. VMs will only be able to communicate with other VMs.
Choose which type of virtual switch you would like to create, then click "Create Virtual Switch."
The new virtual switch is now created. Even though you must choose a type of virtual switch on creation, you will be able to change it to a different type later if you so choose, as shown in the screenshot below. You can change the name of the virtual switch, add notes, and enable or disable VLAN identification for this switch. Set the options as desired, then click "OK" to save any changes.
Finally, to change any existing VMs to use the newly-created virtual switch, right-click on them in the main Hyper-V Manager window, then click "Settings..." in the menu. In the left-hand pane of the Settings window, click "Network Adapter". Then, in the right-hand pane, choose the virtual switch from the dropdown menu. Here, you can specify the VLAN that the VM should use to communicate through the network adapter, as well as assign minimum and maximum bandwidth rates that Hyper-V should dedicate to the machine's network adapter. Make any necessary changes, then click "OK."
The virtual machine will now communicate through the newly-created virtual switch. If you move a VM from an External switch to one that uses Internal or Private networking, be aware that it may lose internet connectivity.


No comments:
Post a Comment